

Do It Yourself Asphalt Driveway Repair
How to Set up a Sinking Driveway
Updated: Nov. 29, 2022
Repair the frock in front of your garage door.
This article shows you what to do when your driveway starts to sink and pull away from your garage floor. The fix is easier than you might recall, and you tin can practice it yourself.
Y'all might besides like: TBD
- Fourth dimension
- Complication
- Cost
- A total day
- Beginner
- $101–250
A durable fix for a sinking driveway apron
Information technology's normal for asphalt driveways to sink a bit over time. Only when your driveway repair has sunk to the betoken where it's 4 or v in. lower than your garage floor, it'south time to fix information technology. If yous don't, water volition pool in the depression, seep into the soil below, and eventually destroy the driveway.
Cobblestone companies charge well-nigh $1,000 to dig out the old portion and install a new apron. Physical contractors accuse even more than. Simply you lot can rebuild your asphalt driveway apron yourself. The entire job takes a full mean solar day and it's non much fun. But the materials and tools only price about $250, so the savings is worth information technology.
You'll need a diamond blade for your round saw, a tamper, a pry bar and a short square-blade shovel. Plus, you'll need plenty cold patch material to make full in the trench you make (sold at home centers). To effigy out how many bags y'all'll need, refer to the depth and width tables on the bag. Finally, you'll need mineral spirits and rags for cleanup.
Cold patch cures past solvent evaporation, and it takes near 30 days to reach a full cure. So the best time to do the project is during an extended warm, dry out spell. Y'all can do it in leap or fall, but cold weather and rain will greatly extend the cure time.
This driveway repair is a messy chore, and no thing how careful yous are, you're going to become tar on your clothes and shoes. You can't wash off the tar with soap and water. So wear old apparel and shoes that you can toss into the trash when you lot're done. If you have to go into the house during the project, leave your shoes outside so yous don't track tar into the firm.
Hither'southward how to make the DIY driveway repair.
DIY Driveway Repair: Cutting out the sunken area
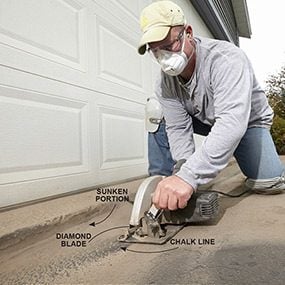
Photograph 1: Cut out the sunken cobblestone
Slap a diamond bract into your circular saw and gear up it to its maximum cutting depth. Then snap a chalk line out from the garage floor to a maximum altitude of 24 in. Habiliment an N95 respirator and safety glasses and cut out the old asphalt.

Photo ii: Put in the lesser layer
Pour in a small amount of cold patch material and level it with a square-blade shovel. Tamp downwards a exam section and measure the depth. The bottom layer should only be 1/ii in. thick when compacted. Add together or remove common cold patch material and then tamp down the entire starter row.
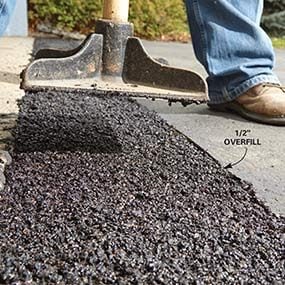
Photo iii: Build additional layers
Add and meaty the cold patch in i-in. layers until you accomplish the garage flooring. Then overfill with an additional 1/2 in. of material and tamp to go a smooth surface.
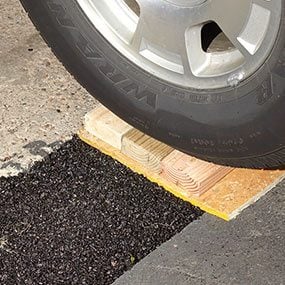
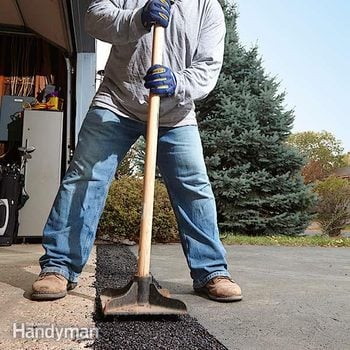
Photo 4: Drive over information technology to compact
Cut a piece of plywood slightly wider than the trench. Lay it over the patch material and comprehend information technology with 2x4s. Then drive over information technology several times with your vehicle until the patch is level with the garage floor.
Cold patch works simply when it's compacted and "keyed" into at least 2 vertical surfaces. So don't think you can build up the driveway height by pouring cold patch on summit of the old sunken asphalt—the patching cloth will just break off in chunks. Instead, yous'll have to cut out the sunken asphalt (Photograph 1). Subsequently information technology's cutting, lay a block of woods on the soil at the border of the driveway, shove a pry bar under the erstwhile cobblestone, and pry confronting the wood block. The one-time asphalt will lift up and pause off in sections. Remove all the cut cobblestone and scrape off whatever caulking material sticking to the border of the garage floor.
Side by side, build a starter row of patch material (Photo 2). Once the starter row is in identify and tamped, apply additional patch material in 1-in. layers (Photo 3). Resist the temptation to completely fill the expanse and compact it in ane savage swoop. You just can't exert enough compaction strength with a tamper to properly key information technology into the vertical surfaces—the patch material will just pitter-patter out the sides when you lot drive on information technology. Once your tamped layers are level with the garage floor, add a terminal topping layer. And so lay down forest scraps and utilize your vehicle to practise a terminal compaction (Photo four). Clean all your tools with mineral spirits and dispose of the rags properly to forestall spontaneous combustion. The instructions say you can drive over the patch immediately. But tires may however make slight depressions in the asphalt until it's fully cured, which takes 30 days. So get out the plywood in identify for a few weeks at least.
Pavers Are Another Choice
Another approach to fixing a sunken driveway is to make an frock from paving brick. It'south attractive, you can do information technology yourself, and you tin can easily reset the pavers if the soil settles again. Follow these steps:
- Snap a chalk line parallel to the garage door. Make certain information technology's out far enough to include all the settled asphalt. Lay out a row of your paving bricks, starting confronting the garage floor slab to position the chalk line at a full brick.
- Cut through the asphalt (information technology's usually two to 3 in. thick) forth the chalk line. Be sure to wear hearing and eye protection.
- Remove the asphalt and dig a 12-in.-deep trench. Angle the wall of the trench slightly under the remaining asphalt. Rent a plate compactor and run it along the trench at least four times to compact the soil. Line the sides and bottom of the trench with landscape cloth. It'south available from landscape suppliers.
- Spread a 2-in. layer of Class Five or other compactable gravel, dampen it and run the compactor over it four times. Continue to spread and meaty the gravel in 2-in. layers until it's iii in. below the existing driveway.
- Install paver edging along grass edges and spread a 1-in. layer of coarse sand. Don't compact it.
- Gear up your pavers, compact them with the plate compactor and fill the joints with sand. Exist sure to apply a joint stabilizing sealer to go on the sand from washing out.
Required Tools for this DIY driveway patch Projection
Have the necessary tools for this DIY driveway patch project lined up before yous start—you'll relieve fourth dimension and frustration.
You'll also need a diamond blade, a square-blade shovel and a tamper.
Required Materials for this DIY driveway patch Project
Avoid last-infinitesimal shopping trips by having all your materials ready ahead of fourth dimension. Here's a list.
Originally Published: November 29, 2022

Do It Yourself Asphalt Driveway Repair,
Source: https://www.familyhandyman.com/project/how-to-fix-a-sinking-driveway/
Posted by: barnhartreme1993.blogspot.com
0 Response to "Do It Yourself Asphalt Driveway Repair"
Post a Comment